

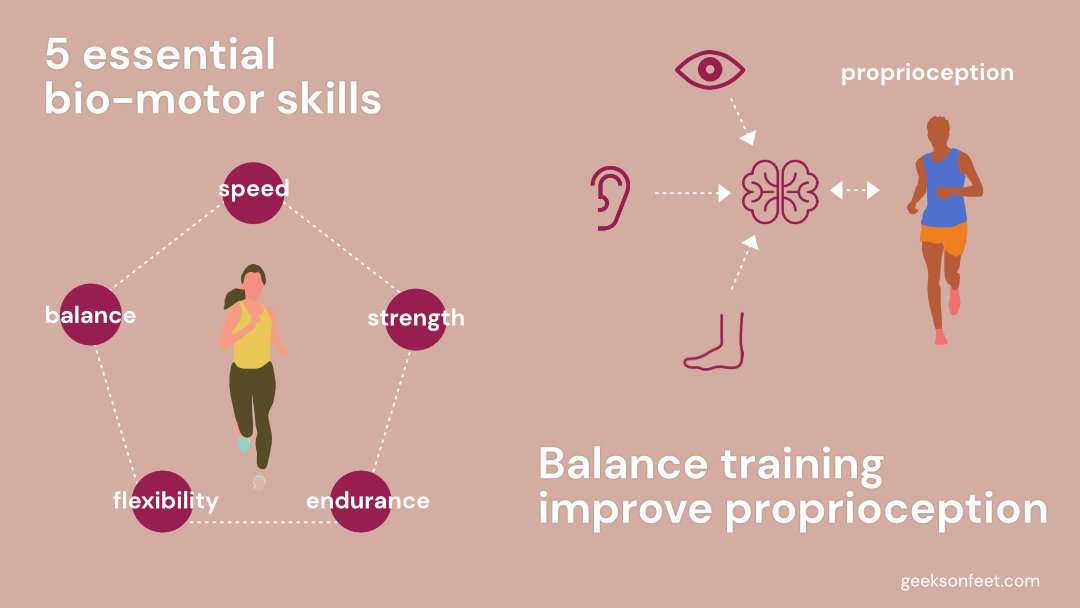
What are Balance and Proprioception? Balance is the maintenance of the center of gravity over the base of support; it is both a static and dynamic quality.

Balance is the maintenance of the center of gravity over the base of support; it is both a static and dynamic quality. Balance is a key component of coordination, one of the five biomotor skills needed for athletic performance ( Speed • Strength • Endurance • Flexibility among the others). Balance training improves Proprioception.
Proprioception is the body’s internal sense of position, motion, and equilibrium. It’s the body’s awareness of its position and motion of its joints position in space. Proprioception training is highly correlated to athletic performance and a reduced risk of injury and re-injury, especially with respect to ankles.
The conscious and subconscious knowledge of our body’s position in relation to the space around it, as well as the preservation of our center of gravity’s stability, are the foundations of balance and proprioception.
If you’re incapacitated due to an injury, even intense commitment, a tough training plan, and natural skill won’t take you very far. Proprioception is one of the most important things a runner can use to avoid injury or recover from one. This is particularly true for runners who run on uneven terrain such as trail, dirt, gravel, sand, etc. On this uneven terrain, improved proprioception means increased responsiveness and awareness.
In fact, according to research published in The American Journal of Sports Medicine, a balance-training program targeted at improving proprioception lowers the likelihood of ankle sprains in athletes. Because runners are prone to sprains, pulls, and strains, improved proprioception means safer running.
We have sensory neurons, which will accept information in an afferent direction, meaning it will come in from the environment and be processed by our central nervous system and brain. Then there are motor or efferent neurons, which will take any information from our brain and central nervous system and let activity out into the world. These cells may make new connections despite their incapacity to split, and we may enhance particular connections by adding genuine synapses. Neuroplasticity or synaptic plasticity refers to this ability for us to create new patterns or new pathways through increasing connections or increasing synapses along the pathways associated with the behaviors we want to maximize, like resting, de-stressing, balancing, running, etc.
There have been studies conducted in the recent past that conclude that stress negatively affected dynamic and static balance, even for short periods of time. A study done in Turkey in 2018 concluded that an increase in stress-related cortisol negatively impacts the ankle proprioception sense.
Yoga practices that include asana, pranayama, and deep relaxation help reduce stress and in turn reduce the stress-induced cortisol, this directly relates to improved balance and proprioception abilities. Balancing asanas help develop the functions of the cerebellum, the brain center that controls how the body works in motion.
The focus required to perform these asanas with steadiness develops concentration and balance at the emotional, mental and psychic levels removing stress and anxiety. For relief of excessive tension, these asanas should be held for as long as possible.
To steady the mind, practice concentration on one point at eye level or naval level on the ground or as indicated in the individual asana practice. This allows the body to maintain seemingly difficult positions for long periods of time. Balancing asanas may be difficult to perform at first however the body is very adaptable and progress will quickly be made with a few weeks of regular practice, carefully observing the contraindications given for individual practice.
Breathing- Breathe normally throughout the practice.
Duration- Practice up to 3 rounds on each leg, holding the final position for up to 2 minutes.
Awareness- On a fixed point at eye level.
Variation- Assume the final position. Keep the gaze focused at eye level, inhale and raise the arms above the head, palms together. Hold the position with the breath inside and on exhalation, lower the hands back in front of the chest. Repeat on the other side.
Breathing- Breathe normally throughout the practice.
Contra-indications - People suffering from cardiac issues, high blood pressure, back problems, hernia, colitis, peptic or duodenal ulcers, or vertigo should not practice this asana.
Benefits- This asana strengthens the back, shoulders, arms, hips and legs. It helps develop a sense of balance and coordination and improves concentration.
Breathing - Inhale while raising the arms. Exhale while bending to assume the final position. Breathe normally in the final position. Inhale while returning to the upright position. Exhale while lowering the arms.
Duration - Up to 3 times on each side, holding for as long as is comfortable on each side.
Awareness - on maintaining the alignment of limbs and spine, and on maintaining balance.
Sequence - This posture must be preceded or followed by a backward bending asana like makarasana or setubandhasana.
Contra-indications - People with lower back problems, heart problems or high blood pressure should not do this asana.

Breathing - Inhale while standing on one foot in the starting position. Retain the breath while lowering the body. Breathe normally in the final position. Inhale and retain the breath while raising the body. Exhale when once more standing upright.
Awareness - on maintaining the balance, especially while transferring the weight in the different stages of the practice, and on the upward surge of energy and strength in legs while raining the body.
Contra-indications - This is a strenuous practice. People with sciatica, slipped disc, weak back, hips, knees or ankles, herniam heart problems or high blood pressure should not practice this asasa.
Benefits - Strengthens the leg muscle and knee joints. It helps develop coordination and balance.
Variation - In the final posture stretch the arms downward at a 45 degree angle or stretched sideways like the wings of a bird.
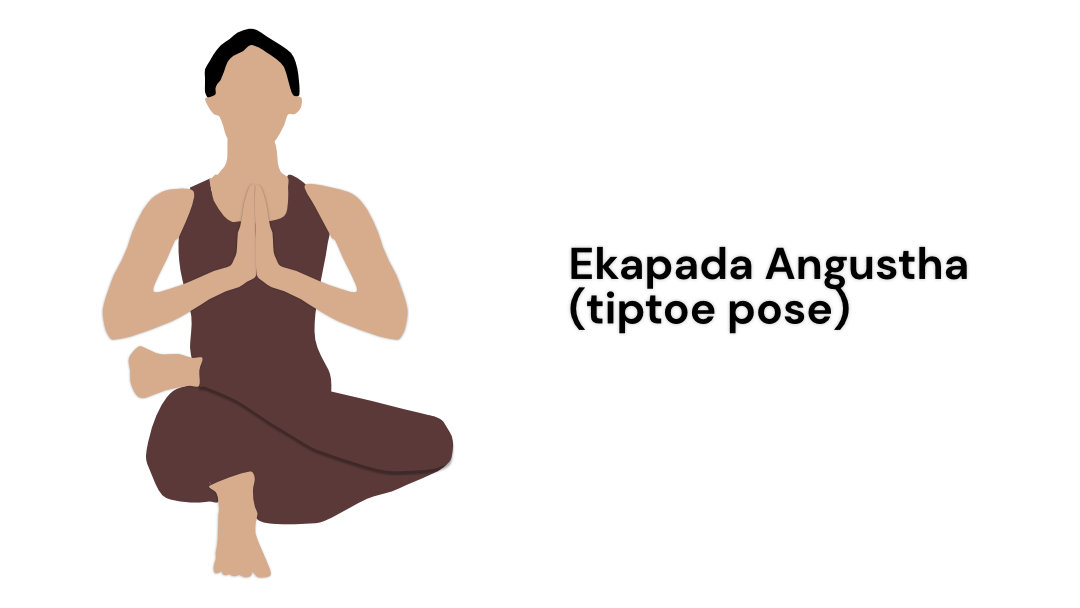
Breathing - Breathe normally throughout the practice.
Awareness - on the pressure of the heel while maintaining balance.
Contraindications - People with sciatica, slipped disc, ankle or knee problems should not practice this asana.
Benefits - Strengthens the toes and ankles. Helps improve concentration, focus and balance.
Books:
Courses:
We put substantial time and resources into bringing this content to India's running community. If you like what we do, consider chipping in — every bit helps keep the lights on.
See the Thank You Wall →
